5 Easy Steps to Create Your DIY Terrarium in 2026: A Mini Garden Guide
A DIY terrarium is a small indoor garden built inside a glass container. This 2026 beginner guide breaks the process into five simple steps: prep the container, layer the base, choose plants, care for the setup, and troubleshoot common problems.
For a deeper version of this process, read DIY Terrarium Made Easy. For moss selection and care, see the terrarium moss guide.
Key Takeaways
- Start with the right container: open vessels suit succulents, while closed vessels suit mosses and ferns.
- Layer carefully: drainage stones, charcoal, barrier material, and soil help keep roots healthy.
- Group plants by care needs: avoid mixing drought-loving and humidity-loving plants without planning zones.
- Water lightly: most terrariums need less water than beginners expect.
- Watch for early warning signs: mold, fogging, yellow leaves, and soggy soil usually mean too much moisture.
Step 1: Prep Your Container
Choose a clear glass vessel that fits your plant type. Open containers such as bowls and jars are better for succulents and cacti. Closed containers such as lidded jars are better for ferns, mosses, and tropical plants.
Clean the container before planting. Wash with mild soap, rinse thoroughly, and dry it completely. A clean container reduces the chance of mold, residue, and cloudy glass.
Step 2: Layer the Base
Good layers help manage moisture and keep the terrarium stable.
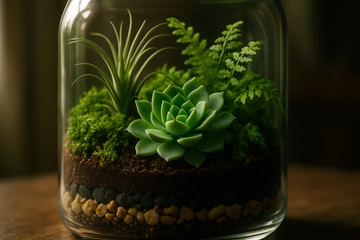
- Add 1–2 inches of clean pebbles, gravel, or LECA for drainage.
- Add a thin layer of activated charcoal to help keep the setup fresh.
- Add a mesh, moss, or coconut-fiber barrier to stop soil from sinking into the drainage layer.
- Add soil matched to your plants.
Use a gritty cactus mix for succulents. Use a moisture-retentive mix with coco coir, peat, orchid bark, or perlite for ferns and mosses.
Step 3: Choose and Arrange Plants
Pick compact plants that match the light and humidity of your container. Succulents, haworthia, echeveria, and small jade plants work well in open terrariums. Ferns, fittonia, pilea, and mosses work well in closed terrariums.
Place taller plants toward the back or center. Add mid-height plants next, then finish with low moss, stones, or decorative accents in the foreground. Leave space between leaves and glass so air can move and foliage does not rot.
Step 4: Water and Maintain Carefully
Water sparingly. Open terrariums should dry between waterings. Closed terrariums need much less water and should show light condensation rather than constant wet glass.
- Use a pipette or spray bottle for control.
- Keep the terrarium in bright, indirect light.
- Rotate the container occasionally for even growth.
- Remove dead leaves quickly.
- Open closed terrariums briefly if condensation stays heavy.
Step 5: Troubleshoot Mold and Overwatering
Mold, algae, yellow leaves, slimy stems, or constantly foggy glass usually point to excess moisture. Remove decaying material, open the container for airflow, and reduce watering. If the soil stays soggy, refresh the top layer and check that the drainage layer is not flooded.
For dry, brown tips, increase humidity slightly or move the terrarium away from harsh light and heat sources.
Design Ideas for a Mini Garden
- Beach scene with white sand, stones, and small succulents
- Forest floor with moss, ferns, and driftwood
- Desert bowl with cactus, gravel, and warm-toned sand
- Fairy garden with miniature figures and moss accents
- Minimalist desk terrarium with one focal plant and neutral stones
Conclusion
Creating a DIY terrarium is easier when you keep the process simple: clean container, smart layers, compatible plants, light watering, and quick troubleshooting. With those basics in place, your mini garden can become a low-maintenance piece of living decor.
Frequently Asked Questions
How often should I water my terrarium?
Open terrariums usually need water when the top soil is dry. Closed terrariums need much less water and should be adjusted based on condensation.
What plants are best for a mini terrarium?
Succulents are best for open containers. Ferns, fittonia, pilea, and mosses are better for closed humid containers.
How do I prevent mold?
Use clean materials, avoid overwatering, remove dead leaves, and add airflow when condensation is heavy.
Can I mix succulents and ferns?
You can, but it is usually easier to keep them separate because succulents prefer drier, airier conditions while ferns prefer humidity.


