Key Takeaways
Building a thriving terrarium blends practical know-how with creative flair—from selecting the right vessel to fine-tuning moisture levels and lighting. These key takeaways cover expert tips on containers, substrates, plant choices, kit comparisons, and advanced customizations like smart sensors to help you nail your next terrarium build.
- Select the ideal terrarium vessel: Compare open vs closed designs to match humidity needs, airflow, and aesthetic goals for your chosen plant palette.
- Layer drainage and filtration like a pro: Start with gravel or pebbles, add activated charcoal to prevent odors and mold, then top with specialized substrate layers for healthy root systems.
- Choose the right soil blend: Opt for a well-draining, nutrient-rich mix or a commercial terrarium substrate tailored to your plants’ moisture and growth requirements.
- Pick compatible terrarium plants: Focus on low-growing, humidity-tolerant species (ferns, mosses, succulents) that thrive in your selected container style and light levels.
- Assemble with clear, step-by-step precision: Follow a set order—drainage, substrate, planting, decorative moss—to prevent waterlogging and ensure visual harmony.
- Compare top terrarium kits side by side: Evaluate beginner-friendly and advanced DIY kits by container quality, included supplies, instruction clarity, and overall value.
- Enhance with lighting and smart sensors: Integrate LED grow lights and humidity/temperature monitors for automated care, ensuring optimal conditions beyond ambient room levels.
- Maintain moisture and troubleshoot effectively: Water sparingly based on substrate dampness, adjust ventilation to curb condensation, and tackle common issues like mold or pests with targeted fixes.
Armed with these essentials, you’re ready to dive into in-depth kit reviews, detailed supply lists, and comprehensive build instructions. In the sections ahead, you’ll discover the full roadmap to creating and customizing your perfect terrarium ecosystem.
Introduction
Building a terrarium is more than just a decorative hobby; it's a chance to cultivate a miniature ecosystem that reflects your creative spirit. Did you know that the right balance of moisture, light, and plant selection can make or break your tiny garden? With the right knowledge, you can turn this trend into a thriving, low-maintenance centerpiece for your home or office.
In this ultimate guide, we’ll arm you with everything you need for a successful terrarium build. From selecting the ideal vessel to mastering the layers of drainage and soil, we’ll explore expert tips that set you on a path to creating an eye-catching terrarium. Plus, we'll compare top kits tailored to beginners and seasoned builders alike, ensuring you make informed decisions as you embark on your planting adventure.
Get ready to dive into the essential tools, supplies, and insights that will elevate your terrarium from a simple craft project to a flourishing work of art.
Container Selection & Design Styles for Your Terrarium Build
When planning a mini greenhouse or dish garden for your home, choosing the right container and design style sets the foundation for both aesthetic appeal and plant health.
How to choose between open and closed terrariums
Ever wished you could maintain a miniature rainforest—or a desert landscape—in a single glass container? Your choice between an open or closed system will determine humidity levels, airflow, and maintenance routines.
- Open terrariums
- Pros:
- Excellent ventilation, reducing the risk of mold
- Ideal for succulents, cacti, and air plants
- Cons:
- Lower humidity retention; water more frequently
- Prone to rapid temperature fluctuations
- Closed terrariums
- Pros:
- Create self-sustaining microclimates with high humidity
- Perfect for tropical plants like ferns and fitting for dry indoor air or arid climates
- Cons:
- Can accumulate excess condensation; requires periodic venting
- Risk of mold if airflow is insufficient
When making your decision, consider your plant palette, available light, ambient room humidity, and how often you’re willing to check moisture levels. Watering needs can vary by season, container size, and plant type—from biweekly misting in winter to weekly checks in summer.
Vessel materials, sizes & shapes
When selecting your vessel, weigh clarity, weight, durability, thermal insulation, and maintenance requirements. Material and shape choices influence UV exposure and cleaning ease.
- Materials
- Glass
- Clarity: offers an unobstructed, sparkling view
- Thermal mass: thicker glass provides better temperature stability
- Cleaning: prone to fingerprints; use a soft cloth and vinegar solution
- UV-blocking glass (optional)
- Filters harmful rays; prevents plant scorch in sunny spots
- Acrylic/Plastic
- Weight: light and shatter-resistant
- Drawback: scratches easily and can yellow over time
- Cleaning: use gentle, non-abrasive cleaners to prevent clouding
- Sizes
- Small (≤6″): perfect for desks, nightstands, or tight shelves
- Medium (6–12″): versatile for mixed plantings or layered displays
- Large (12″+): statement pieces; ideal for tabletop centerpieces or living-wall installations
- Shapes
- Geometric (cubes, tetrahedron terrariums): modern, clean lines; showcases layer depth
- Orbs & cylinders: spotlight one or two focal plants in a minimalist setup
- Apothecary jars & fish bowls: classic rounded silhouettes; easy to repurpose
Matching design style to plant palette and humidity needs
Your container’s style isn’t just about looks—it influences microclimate and plant performance. Choose a décor theme that complements your space and your plants’ moisture requirements.
Minimalist
- Design: Clear geometric containers with monochrome substrate layers
- Plants: Low-profile succulents like Echeveria
- Quick scenario: In a sunny bay window, open minimalist terrariums flourish with minimal fuss.
Rustic/Boho
- Design: Mason jars, wooden frames, driftwood accents, mixed mosses
- Plants: Button ferns and Hypnum sheet moss for a cozy woodland feel
- Real-life tip: If you live in a dry apartment, a sealed rustic terrarium compensates for low indoor humidity.
Tropical
- Design: Sealed glass globe or jar with vibrant leaf pops
- Plants: Boston fern, Fittonia, small Calathea varieties
- Case scenario: In a city loft with harsh AC airflow, a closed tropical terrarium maintains a stable, humid environment.
With your container and style selected, it’s time to layer in proper drainage and filtration.
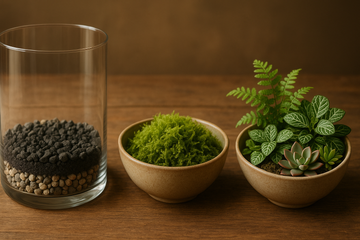
Layering & Drainage Materials in Your Terrarium Build
A thriving mini greenhouse relies on effective moisture management, starting at the bottom layer. Proper drainage and filtration prevent waterlogging and root rot.
Gravel or pebble drainage layer
A solid base ensures excess water drains away from plant roots.
- Depth: 1–2″, adjusted to container height (deeper for larger vessels)
- Materials:
- Pea gravel or aquarium gravel (rinsed)
- Expanded clay pebbles (lightweight, reusable)
- Pro Tip: Rinse all drainage materials thoroughly in running water to remove dust and fine particles.
Activated charcoal for filtration and odor control
Horticultural-grade charcoal keeps your micro-ecosystem fresh by adsorbing impurities.
- Why horticultural charcoal?
- More porous and free of salts compared to aquarium charcoal
- Designed to support plant health without leaching chemicals
- Layer thickness: ½–1″
- Conditioning: Rinse once to remove loose dust; no need to soak
- Benefit: Charcoal is known to help control odors and inhibit unwanted microbial buildup (source: Cooperative Extension horticulture guides).
Sphagnum moss & substrate layers
Sphagnum moss acts as a barrier and moisture buffer between filtration and soil.
- Sphagnum moss:
- Use loose or rehydrated sheet moss
- Prevents fine soil from clogging the charcoal layer
- Substrate layer:
- Add 2–3″ of your chosen soil mix (see next section)
- Common Mistake: Avoid compacting the moss layer—light fluffing ensures optimal drainage and air pockets.
With drainage and filtration in place, it’s time to select a soil mix tailored for healthy roots.
Soil & Substrate Recommendations for Healthy Roots
Choosing the right soil and amendments lays the groundwork for root development and nutrient uptake. Each ingredient plays a role in moisture retention, aeration, or nutrient supply.
DIY substrate mix vs commercial terrarium substrate
Weigh cost, control, and convenience when selecting your growing medium.
- DIY mix
- Typical recipe:
- 2 parts potting soil (loam-based for nutrients)
- 1 part peat moss (high water retention) or coconut coir (sustainable, buffers pH)
- 1 part perlite or pumice (improves aeration and drainage)
- Pros: Customizable ratios, budget-friendly
- Cons: Requires precise measuring; imbalance can lead to soggy or dry patches
- Commercial substrate
- Pre-mixed blend of soil, organic matter, and mineral amendments
- Pros: Consistent moisture and drainage; often enriched with micronutrients
- Cons: Higher cost per volume; less flexibility in tweaking ratios
Nutrient-rich, well-draining soil blends
Ensure a balanced foundation that retains moisture without suffocating roots.
- Recommended ratio: 2 (loam) : 1 (peat/coir) : 1 (perlite/pumice)
- Role of amendments:
- Peat moss: holds water but can compact over time
- Coir: retains moisture while improving soil structure
- Vermiculite: boosts water retention in tropical setups
- Perlite/pumice: creates air pockets for root oxygenation
- Enrichment: Stir in a teaspoon of slow-release fertilizer or worm castings per quart of mix
- Pro Tip: Test pH and aim for around 6.0–6.5, suitable for most terrarium plants.
Customizing substrate layers based on plant moisture needs
Tailor your mix to match the hydration preferences of your chosen species.
- Tropical/humidity lovers
- Increase peat/coir ratio
- Add vermiculite for extra water retention
- Succulents & cacti
- Boost drainage: mix 1 part coarse sand with 1 part perlite/pumice
- Reduce organic matter to prevent over-saturation
With your soil layers dialed in, let’s select the perfect plant residents and care tips.
Terrarium Plants & Care: Best Species & Arrangements
Selecting the right flora transforms your terrarium into a living work of art. Match plant needs to your ecosystem style—closed terrariums thrive with moisture-lovers, while open designs suit drought-tolerant species.
Low-growing, humidity-tolerant ferns & mosses
Ideal for creating a miniature jungle canopy in sealed environments.
- Ferns:
- Maidenhair fern (Adiantum spp.)—delicate fronds that sway in the mist
- Button fern (Pellaea rotundifolia)—compact with glossy leaves
- Mosses:
- Sheet moss (Hypnum spp.)—forms lush green carpets
- Broom moss (Dicranum scopatorium)—adds feathery texture
- Care tip: Maintain humidity above 70% and provide bright, indirect light (2,000–5,000 lux).
- Pro Tip: Rotate your terrarium every few weeks for even growth and to prevent plants leaning toward light.
Succulents & cacti for open terrariums
Showcase architectural forms and vibrant colors in well-ventilated setups.
- Succulents:
- Echeveria elegans—rosette shapes with pastel hues
- Haworthia attenuata—striped, low-light tolerant specimens
- Cacti:
- Mammillaria gracilis—small, clustered globes for texture
- Rebutia species—bright blooms in a compact form
- Care tip: Provide at least 4–6 hours of direct or strong artificial light daily; water sparingly when the top inch of soil is dry.
Plant pairing & arrangement for visual harmony
Create depth, contrast, and focal interest with compositional techniques.
- Scale: Combine taller specimens with low-growing groundcovers
- Texture & color: Balance smooth succulent leaves with feathery fern fronds or velvety moss
- Focal point: Place a standout plant off-center following the rule of thirds
- Common Mistake: Overcrowding can stunt growth—leave breathing room for each plant.
With your plant palette ready, let’s assemble all components step by step.
How to Build a Terrarium Step by Step
Imagine coming home to your own little glass ecosystem, complete with glistening dewdrops and vibrant greenery—all thriving on autopilot. Follow these steps for a foolproof build.
Preparing and cleaning your container
A sterile environment prevents pathogens and algae from taking hold.
- Wash with warm, soapy water.
- Rinse thoroughly to remove any soap residue.
- (Optional) Disinfect by wiping interior surfaces with a 1:10 bleach solution; rinse well and air-dry.
- Alternative: For a natural clean, use white vinegar and water.
Layering drainage, charcoal, and substrate
Build from the bottom up to manage moisture effectively.
- Drainage: Add 1–2″ of rinsed gravel or clay pebbles.
- Filtration: Spread ½″ of horticultural-grade charcoal, rinsed but not soaked.
- Barrier: Gently lay sphagnum moss over the charcoal layer.
- Substrate: Add 2–3″ of soil mix, sloping slightly toward the back for visual depth.
Planting, decorating & sealing your terrarium
Now it’s time to bring your design to life.
- Dig small holes and position plants, firming soil gently around roots.
- Add decorative elements—stones, driftwood, or miniature figurines—for personality.
- Seal closed terrariums with a snug lid or cork; leave open designs without a top.
- Ensure at least 1″ of airspace in sealed setups to avoid over-compression.
First watering and establishing a care routine
Kick off healthy growth with proper moisture management.
- Initial watering: Mist or spray until substrate is evenly moist—avoid pooling water.
- Routine:
- Closed terrariums: Check moisture every 3–6 weeks; mist if condensation subsides.
- Open terrariums: Water approximately weekly, or when the top inch of soil feels dry.
- Adjust frequency by season, container size, and plant composition.
With assembly complete, discover the best kits to jumpstart your terrarium journey.
Best Terrarium Kits for Beginners & DIY Enthusiasts
From all-in-one DIY terrarium kits to repurposed dish gardens, these curated starter sets bundle tested components and clear instructions—perfect for time-strapped decorators, plant lovers, or anyone seeking a mini greenhouse kit experience.

Top kits with all supplies included
| Kit Name | Container Type | Supplies Included | Price | Rating |
| GreenThumb Starter | Glass orb | Gravel, charcoal, moss, soil, plants, tools | $45.99 | 4.6/5 |
| Urban Jungle Kit | Geometric cube | Full substrate layers, selection of ferns & moss | $59.99 | 4.4/5 |
| Succulent DIY Kit | Open bowl | Sand mix, pebbles, succulents, decorative stones | $39.99 | 4.7/5 |
Insight: While repurposing household jars offers a budget-friendly dish garden, specialized kits combine optimized ratios and curated plant selections for reliable results.
Advanced kits for customization
For enthusiasts seeking tech and lighting integration:
- LED-Integrated Terrarium Kit: Programmable full-spectrum LEDs, timer function
- Smart Terrarium Pro: Built-in humidity sensor, Bluetooth app connectivity, micro-fan
- Features: Automated climate control, data logging, remote alerts
Expert reviews & user testimonials
Real feedback to guide your choice:
- “GreenThumb Starter exceeded my expectations—plants arrived healthy and the step-by-step guide was a lifesaver,” says Alex P. (4.7/5).
- “Smart Terrarium Pro’s humidity alerts saved my ferns during winter,” notes Maria S. (4.5/5).
Next, let’s explore lighting and smart sensors to elevate your glass ecosystem.
Lighting & Smart Sensors: Enhancing Your Terrarium Build
Light and climate control can transform your terrarium from a decorative accent into a thriving indoor habitat.
LED grow lights vs natural & ambient lighting
How you light your terrarium affects growth, color, and energy use.
- LED grow lights
- Pros: Customizable spectrum; low heat; energy-efficient
- Cons: Higher upfront investment; mounting required
- Natural light
- Pros: Free, full spectrum
- Cons: Intensity varies; direct sun can overheat the glass
- Ambient indoor lighting
- Pros: Decorative; gentle illumination
- Cons: Often insufficient for sustained plant health
- Pro Tip: Program LED cycles to mimic sunrise and sunset, encouraging natural growth rhythms.
Installing humidity & temperature monitors
Accurate environmental data keeps your ecosystem in balance.
- Hygrometers
- Analog: simple, no calibration needed
- Digital: precise; many sync with smartphone apps
- Thermometers
- Place near the canopy, away from glass edges to avoid false readings
- Source: University extension publications recommend sensors for preventing stress in closed systems.
Automating care with smart sensors
Let technology handle the basics so you can enjoy the view.
- Smart humidity sensors trigger misters or send notifications when levels dip
- Programmable micro-fans reduce excess moisture, preventing mold
- Integration: Link devices via IFTTT or smart-home hubs for scheduling and data logging
With lighting and sensors dialed in, let’s cover long-term upkeep and troubleshooting.
Maintenance, Troubleshooting & Long-Term Care
Even self-sustaining ecosystems need a bit of babysitting. Regular checks and quick fixes keep your terrarium vibrant year-round.
How often should you water a terrarium?
Watering frequency depends on terrarium type, plant mix, and seasonal changes.
- Closed terrariums: every 4–6 weeks, using condensation as a guide
- Open terrariums: weekly or when the top inch of soil dries
- Seasonal note: In winter, reduce watering; in summer, humidity and evaporation increase water needs.
Managing condensation & ventilation
Proper airflow prevents mold and keeps foliage crisp.
- Weekly venting: Remove the lid for 1–2 hours to exchange air
- Glass cleaning: Wipe the interior with a soft, lint-free cloth to remove algae or mineral deposits
- Pro Tip: Use a gentle vinegar solution for stubborn water spots without harming plants.
Common issues: mold, pests & fixes
Stay proactive—catch and correct problems early.
- Mold
- Cause: High humidity, limited airflow
- Fix: Increase ventilation; remove affected material; refresh charcoal layer
- Fungus gnats
- Cause: Overwatering, organic build-up
- Fix: Employ yellow sticky traps; allow substrate to dry; introduce beneficial nematodes
- Algae
- Cause: Excess light and moisture
- Fix: Lower light intensity; clean glass surfaces
- Root rot in succulents (open terrariums)
- Cause: Low light and waterlogged substrate
- Fix: Improve drainage mix; increase bright light; reduce watering frequency
Case Study: resolving mold by adjusting drainage & airflow
A hobbyist observed white mold colonizing her closed terrarium after two months. After diagnosing poor drainage and stagnant air, she implemented simple tweaks:
- Added an extra ½″ of horticultural charcoal
- Drilled two ¼″ ventilation holes into the lid
- Installed a USB-powered micro-fan set to run one hour daily
As a result, humidity stabilized around 70% (down from ~90%), mold receded within two weeks, and the fern’s new growth showed an observed improvement in vigor.
With these maintenance strategies, your terrarium build will remain a thriving, miniature ecosystem for years to come.
Conclusion
Successfully creating and maintaining a terrarium relies heavily on selecting the right container, plant species, and care techniques as outlined in this guide. Choosing between open and closed designs affects not only aesthetic appeal but also microclimate and plant health, as each setup has unique requirements for humidity and airflow. Additionally, the choice of vessel materials and sizes influences not just the terrarium's appearance but also its functionality in supporting the plant species selected.
Emphasizing the importance of effective layering with proper drainage, filtration, and soil mixes can make all the difference in nurturing a thriving ecosystem. As you embark on your terrarium journey, remember that thoughtful planning and understanding your plants' needs will ultimately lead to a successful mini greenhouse that enhances your living space.
Looking forward, consider how integrating smart technology and routine maintenance can extend the lifecycle of your terrarium, turning a decorative piece into a dynamic and engaging aspect of your home environment. Are you ready to cultivate your own miniature paradise? The possibilities await!
Frequently Asked Questions (FAQ)
Q: What materials are required to build a terrarium?
A: You need a clear container (glass or acrylic), a drainage layer of pea gravel or expanded clay pebbles, a filtration layer of horticultural-grade charcoal, a barrier of sphagnum moss, 2–3″ of substrate (either a DIY mix of potting soil, peat moss or coconut coir, and perlite or pumice, or a commercial blend), plus your chosen plants and any decorative elements.
Q: What is the difference between open and closed terrariums?
A: Open terrariums offer excellent ventilation—ideal for succulents, cacti, and air plants—but they retain less humidity, require more frequent watering, and are prone to rapid temperature swings. Closed terrariums trap moisture to form self-sustaining microclimates suited to tropical plants but can accumulate excess condensation and need periodic venting to prevent mold.
Q: How often should you water a terrarium?
A: Closed terrariums generally need misting or watering every 4–6 weeks, using condensation levels as a guide. Open terrariums should be watered about once a week or whenever the top inch of soil feels dry, with adjustments for seasonal changes.
Q: How do you layer drainage, charcoal, and substrate in a terrarium build?
A: Start with 1–2″ of rinsed gravel or clay pebbles, add ½″ of rinsed horticultural-grade charcoal, lay loose or rehydrated sphagnum moss over the charcoal layer, then top with 2–3″ of soil mix, sloping it slightly toward the back for visual depth.
Q: Why is horticultural-grade charcoal important in a terrarium?
A: Because it’s more porous and free of salts than aquarium charcoal, it adsorbs impurities, helps control odors, and inhibits unwanted microbial buildup without leaching harmful chemicals.
Q: How should you customize your substrate mix for succulents versus tropical plants?
A: For tropical or humidity-loving species, increase the peat moss or coconut coir ratio and add vermiculite for extra moisture retention. For succulents and cacti, boost drainage by mixing coarse sand with perlite or pumice and reduce the organic matter to prevent over-saturation.
Q: Which plants are best suited for open terrariums, and how should you care for them?
A: Open terrariums suit succulents like Echeveria elegans and Haworthia attenuata and cacti such as Mammillaria gracilis and Rebutia species. Provide 4–6 hours of direct or strong artificial light daily and water sparingly when the top inch of soil is dry.
Q: Which plants thrive in closed terrariums, and what conditions do they require?
A: Closed terrariums favor ferns such as Maidenhair (Adiantum spp.) and Button fern (Pellaea rotundifolia) and mosses like sheet moss (Hypnum spp.) and broom moss (Dicranum scopatorium). Maintain humidity above 70%, bright indirect light (2,000–5,000 lux), and rotate every few weeks for even growth.


